In a world where convenience often trumps nutrition, the humble protein bar has emerged as a go-to snack for busy bees, fitness enthusiasts, and health-conscious individuals alike. Yet, many store-bought options come laden wiht hidden sugars, artificial flavors, and questionable ingredients. What if you could take control, transforming simple pantry staples into power-packed, wholesome bars tailored to your taste and nutritional needs? Welcome to the art of crafting DIY protein bars-a flavorful fusion of creativity, nourishment, and mindful eating. This guide will walk you through everything you need to know to whip up your own wholesome snacks, proving that fueling your body with clean energy can be as satisfying as it is simple.
Choosing the Perfect Ingredients for Maximum Nutrition and Flavor
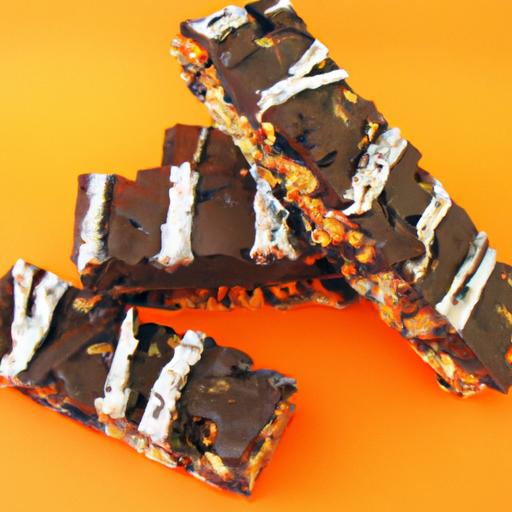
Crafting DIY Protein Bars begins with sourcing wholesome, nutrient-dense ingredients that not only fuel your body but also delight your palate. The foundation of a great homemade bar lies in balancing proteins, healthy fats, natural sweeteners, and fibrous elements to create a snack that’s as flavorful as it is nourishing.
Start with a high-quality protein source such as plant-based protein powder for a cleaner, lighter texture or classic whey protein isolate for muscle recovery and satiety. Pair this with rolled oats for sustained energy and a pleasant chewiness, while nut butters like almond or sunflower provide richness and healthy monounsaturated fats. for sweetness, opt for natural sweeteners like pure honey, maple syrup, or dates, which offer minerals and antioxidants beyond simple sugar.
To maximize flavor, incorporate a pinch of sea salt and aromatic spices-cinnamon, nutmeg, or vanilla extract-to lift the taste profile. using fresh, minimally processed ingredients enhances both nutrition and mouthfeel, allowing you to enjoy every bite with satisfaction.
Mastering the Art of Texture and Consistency in Homemade Protein Bars
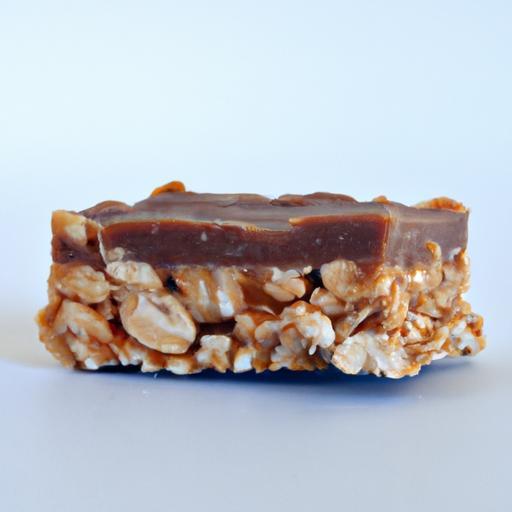
A perfect protein bar is all about texture harmony-each bite should tantalize your senses with the right balance of chew, crunch, and softness. Achieving this demands close attention to ingredient ratios and binding agents.
Use sticky binders like mashed bananas, nut butter, or pureed dates to hold the mixture together without compromising moisture.The key is to add liquid components gradually, testing the mix to ensure it’s firm enough to shape but not dry or crumbly.
For added crunch, toss in chopped nuts, seeds, or puffed quinoa, but be mindful not to overwhelm the bar’s structure. Press the mixture firmly but gently into your baking pan, then refrigerate or freeze to set. This chilling step solidifies the bars’ body and prevents them from falling apart during handling.
Creative Add-Ins to Boost Energy and Enhance Taste
Elevate your protein bars by incorporating creative add-ins that provide an energy kick and elevate flavor complexity. Think beyond the basic mix-superfoods and natural nibblers offer both nutrition and delightful surprises.
- Chia seeds or flaxseeds for omega-3 fatty acids and a subtle crunch
- Dried cranberries, goji berries, or unsweetened coconut flakes to add bursts of sweetness and texture contrast
- Cacao nibs or dark chocolate chips for antioxidants and a bittersweet depth
- Espresso powder to awaken your senses with a mild coffee undertone
- Sunflower or pumpkin seeds to provide extra crunch and essential minerals
These creative inclusions ensure your homemade protein bars never feel mundane and always deliver sustained energy to conquer your day.
Storage Tips to Keep Your DIY Protein Bars Fresh and delicious
Longevity and freshness matter when you’re dedicated to crafting DIY protein bars. To preserve flavor and texture, tightly wrap or place bars in an airtight container. Refrigeration dramatically extends shelf life, maintaining chewiness and preventing rancidity in nut butters or seeds.
For longer storage, freeze bars individually wrapped in parchment paper or plastic wrap, then transfer to a sealed bag. Thaw naturally at room temperature or briefly in the fridge before enjoying. Avoid storing bars in humid environments, as this can compromise consistency.
Proper storage not only keeps your bars tasting home-crafted but also ensures convenience for on-the-go nutrition whenever you need it.
Prep and Cook Time
- Preparation: 15 minutes
- Setting Time (Chilling): 1 hour
- Total Time: 1 hour 15 minutes
Yield
Makes 10 energizing protein bars
Difficulty Level
Easy – perfect for beginners and seasoned snack makers alike
Ingredients
- 1 ½ cups rolled oats
- 1 cup protein powder (your choice: whey or plant-based)
- ½ cup natural almond butter (or sunflower seed butter)
- ⅓ cup pure honey or maple syrup
- ⅓ cup chopped mixed nuts (almonds, walnuts, pecans)
- ¼ cup chia seeds
- ⅓ cup dried cranberries (unsweetened)
- 1 tsp vanilla extract
- ½ tsp sea salt
- Optional: 2 tbsp cacao nibs or dark chocolate chips
Instructions
- Prepare your pan: Line an 8×8-inch square pan with parchment paper, leaving some overhang for easy removal.
- Combine dry ingredients: In a large bowl, stir together rolled oats, protein powder, chopped nuts, chia seeds, dried cranberries, sea salt, and cacao nibs if using.
- Mix wet ingredients: In a microwave-safe bowl, gently warm almond butter and honey for 20-30 seconds until soft and runny. Stir in vanilla extract.
- Blend: Pour wet mixture into dry ingredients. Using a sturdy spoon or your hands, combine thoroughly until all dry ingredients are moistened and sticky. add a splash of water or almond milk only if too dry.
- Shape the bars: Transfer mixture to the lined pan. Press firmly and evenly with your hands or the bottom of a flat spatula to compact. The firmer the compression, the better the bars will hold together.
- chill and set: Refrigerate the pan for at least 1 hour until bars firm up.
- Cut and store: Lift the block out using parchment overhang and slice into 10 bars using a sharp knife. Store in an airtight container in the fridge.
Tips for Success
- customize protein type: Swap protein powder based on dietary needs-pea, hemp, and brown rice powders are excellent vegan proteins.
- Adjust sweetness: Taste the mixture before chilling. Add more maple syrup or honey if you prefer a sweeter bar.
- Binding fixes: If bars crumble after chilling, press the mixture firmer next time or add a tablespoon of nut butter or mashed banana.
- Make-ahead: Bars store well in the freezer up to 3 months. Separate each bar with parchment paper to avoid sticking.
Serving Suggestions
Enjoy these protein bars as a pre-workout energizer or a satisfying afternoon bite. Serve slightly chilled or at room temperature alongside a refreshing green smoothie or a cup of your favorite herbal tea. Garnish by sprinkling a few cacao nibs or toasted coconut flakes over bars before serving for an elegant touch.
| Nutrient | per Bar (approx.) |
|---|---|
| calories | 220 kcal |
| Protein | 15 g |
| Carbohydrates | 18 g |
| Fat | 9 g |

For more tips on boosting your snack game, explore our energy-boosting snack recipes or visit healthline’s expert guide on protein bars for nutrition insights.
Q&A
Q&A: Crafting DIY Protein Bars – Your Guide to Nutritious Snacks
Q1: Why should I make my own protein bars rather of buying them?
A: Homemade protein bars empower you to control every ingredient, ensuring you get clean, wholesome nutrition without hidden sugars, preservatives, or artificial additives. Plus, customizing flavors and textures means your bars can be as adventurous or as simple as you like-perfectly tailored to your taste and dietary needs.
Q2: What are the key ingredients I need to craft a balanced protein bar?
A: A solid protein bar blends protein sources (think nut butters, protein powders, or seeds), healthy fats (like nuts, seeds, or coconut oil), complex carbs (oats, quinoa, or dried fruits), and natural binders such as honey, maple syrup, or dates. Together, thay create a satisfying snack that fuels your body and keeps you energized.
Q3: Can I make protein bars without using any protein powder?
A: Absolutely! Nut butters such as almond, peanut, or cashew are natural protein boosters. Chia seeds, hemp seeds, and even Greek yogurt (used carefully in no-bake recipes) can enrich your bars with protein. Combining these with grains and nuts creates a protein-rich bar sans powders.
Q4: How do I ensure my DIY protein bars have the right texture-chewy but not crumbly?
A: The balance of wet to dry ingredients is key. Sticky binders like nut butter and natural syrups help hold everything together, while oats and chopped nuts add chewiness. pressing your mixture firmly into the pan before chilling ensures bars that slice cleanly without falling apart.
Q5: What’s the best way to store homemade protein bars?
A: Keep your bars in an airtight container in the fridge to maintain freshness and firmness, especially if they contain coconut oil or nut butters. For longer storage, wrapping individually and freezing them works great-just thaw before enjoying.
Q6: Can I customize flavors without compromising nutrition?
A: Definitely! Spices like cinnamon, vanilla extract, or cocoa powder lend robust flavors without adding sugar or calories.Incorporate dried fruits, unsweetened coconut flakes, or a sprinkle of sea salt for added complexity. The key is to use natural,whole-food ingredients to keep your bars both tasty and nutritious.
Q7: How can DIY protein bars fit into different dietary lifestyles?
A: DIY bars are incredibly versatile! Use gluten-free oats and seeds for gluten sensitivity, swap in plant-based protein sources for vegan or vegetarian diets, and adjust sweeteners to fit low-sugar or keto plans. The flexibility allows you to craft snacks aligned with your unique health goals.
Q8: Any tips for beginners trying out their first protein bar recipe?
A: Start simple-choose a basic recipe with minimal ingredients and no-bake preparation. Measure carefully, mix thoroughly, and press the mixture firmly into your pan. Don’t be afraid to tweak the recipe based on initial results; experimenting is part of the fun and leads to your perfect personal bar.
Q9: What are some creative add-ins to make my protein bars exciting?
A: Think beyond the usual: roasted chickpeas for crunch, spirulina powder for a nutrient boost, or a sprinkle of cacao nibs for bitter-sweet depth. Even adding a swirl of natural nut butter on top before setting can transform your bars into gourmet treats.
Q10: How much protein should a homemade bar ideally contain?
A: Aiming for 10-15 grams of protein per bar is a good guideline to keep your snack filling and muscle-supportive. This depends on your dietary needs and activity level, but balancing with carbs and fats ensures sustained energy without spikes or crashes.
In Retrospect
Embarking on the journey of crafting your own protein bars transforms snacking from a mere routine into an act of intentional nourishment. With the right blend of wholesome ingredients and a touch of creativity, you hold the power to tailor each bar to your unique taste and nutritional needs. Beyond convenience, these DIY bars become a testament to mindful eating and personal wellness. So next time hunger strikes, reach for a snack that’s as thoughtfully made as it is satisfying-because nutritious fuel is just a recipe away.