There’s something truly magical about biting into a sugar cookie-its delicate sweetness, buttery crumb, and melt-in-yoru-mouth texture create a simple yet unforgettable treat. But when it comes to birthdays, these humble cookies transform into stunning canvases of celebration. “Sweet Celebrations: Decorating Sugar Cookies for Birthdays” invites you into the colorful, creative world of cookie decorating, where icing becomes art and sprinkles turn into sparkles of joy. Whether you’re a seasoned decorator or a curious beginner, this guide will inspire you to craft edible masterpieces that not only delight the taste buds but also light up the party with personalized charm. Get ready to mix, pipe, and sprinkle your way to birthday cookie perfection!
Choosing the Perfect Icing and Flavor Combinations to Delight Every Guest
Sweet Celebrations: Decorating Sugar Cookies for Birthdays become truly unforgettable when you master the art of selecting the ideal icing and pairing it with irresistible flavor combinations. The harmony between a smooth, luscious icing and perfectly matched cookie flavors creates an irresistible experience that delights every guest at your party.
For the icing base, royal icing remains the gold standard-its smooth texture hardens beautifully, making it perfect for detailed piping. Alternatively, a silky, creamy buttercream offers softer edges and a melt-in-your-mouth feel, ideal for those craving a richer taste. Both can be easily tinted with vibrant gel food colors to match any birthday theme.
Flavor-wise, classic vanilla sugar cookies provide a versatile canvas, but infusing subtle hints of almond extract, lemon zest, or orange blossom water adds a unique dimension. Pair these nuanced cookie bases with complementary icing flavors like classic vanilla,tangy cream cheese,or even a light lavender or rosewater glaze for an elevated palate experience.
Mastering Intricate Piping Techniques for Stunning Cookie Designs
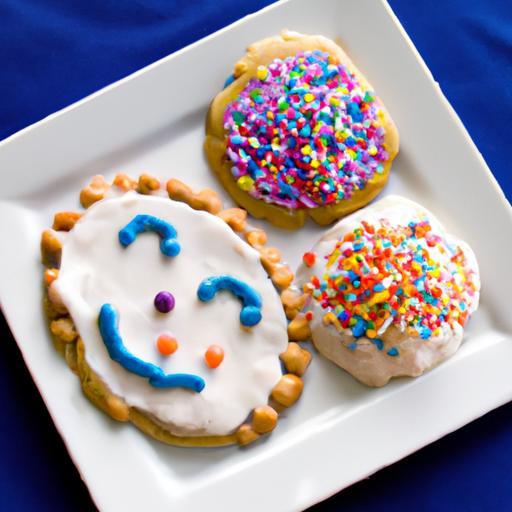
Transforming simple sugar cookies into miniature works of art begins with mastering a few key piping techniques.Start with outlining your cookie shapes to create clean edges and prevent icing from flooding out.Use a piping bag fitted with a fine round tip (size #1 or #2) for detailed lines.
Once outlines dry, flood the interiors with thinner royal icing for a glass-like finish, then add layers of textured dots, ruffles, or rosettes by changing consistency and piping styles. Practice “wet-on-wet” techniques to blend colors or create polka dots and stripes before icing solidifies, giving your cookies a gorgeous, hand-painted effect. Perfect control, steady hands, and patience turn any simple shape into a breathtaking design guaranteed to wow guests.
Incorporating Edible Decorations to Elevate Your Sweet Creations
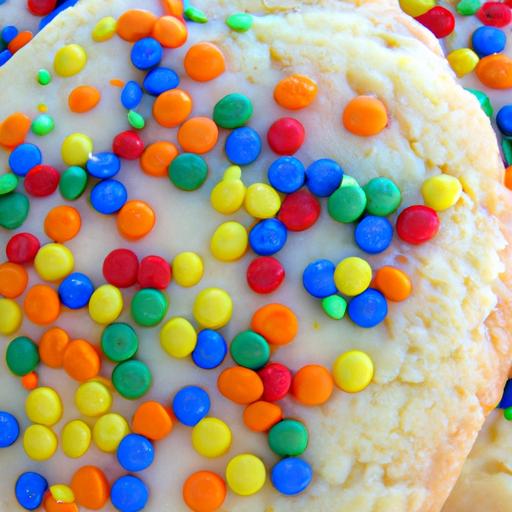
Edible decorations add vitality and dimension to your birthday cookie masterpieces. Tiny sugar pearls,edible glitter,and delicate gold leaf bring a touch of sparkle and sophistication. Fresh edible flowers like violets and pansies contribute stunning natural beauty and gentle floral notes.
Sprinkle colored sanding sugars or crushed freeze-dried fruits on wet icing for bursts of texture and flavor. For an extra whimsical touch, mini fondant shapes such as stars, balloons, or birthday hats can be attached with a dab of royal icing. These simple yet striking embellishments turn every cookie into a memorable fête favor.
Packaging and Presentation Tips for Memorable Birthday Cookie Gifts
Nothing enhances the joy of Sweet Celebrations: Decorating Sugar Cookies for Birthdays more than thoughtful packaging. Wrapping your cookies individually in clear cellophane bags tied with colorful satin ribbons keeps them fresh and showcases your intricate designs.
For gifting, consider pastel-hued boxes with cushy tissue paper or decorative shredded paper to cushion the cookies. personalized gift tags featuring hand-lettered birthday wishes add a charming personal touch. When assembled in layers separated by parchment or wax paper, your cookies remain pristine and ready to impress the lucky recipient. All these preparedness touches create an unforgettably sweet experience beyond the first bite.
Prep and Cook Time
- Planning: 30 minutes
- Chilling: 1 hour
- Baking: 10-12 minutes
- Decorating: 2-3 hours (including drying time)
Yield
about 24 medium-sized decorated sugar cookies
Difficulty Level
medium – Ideal for those comfortable with basic baking and eager to advance their decorating skills
ingredients
- 2 ¾ cups all-purpose flour,sifted
- 1 teaspoon baking powder
- ½ teaspoon fine sea salt
- 1 cup unsalted butter,softened
- 1 ½ cups granulated sugar
- 1 large egg,at room temperature
- 2 teaspoons pure vanilla extract
- 1 teaspoon almond extract (optional,for subtle nutty flavor)
instructions
- Preheat your oven to 350°F (175°C). Line baking sheets with parchment paper.
- Whisk together flour, baking powder, and salt in a large bowl; set aside.
- Cream the butter and sugar in a stand mixer until light and fluffy, about 3-5 minutes.
- Add the egg, vanilla extract, and almond extract (if using), mixing until fully combined.
- Gradually add dry ingredients to wet,mixing on low speed until dough forms and pulls away from the bowl.
- Divide dough into two discs, wrap in plastic wrap, and chill for at least 1 hour to firm up.
- Roll out dough between parchment sheets to ¼-inch thickness on a floured surface to prevent sticking.
- Cut into desired shapes using cookie cutters and transfer to baking sheets, spacing cookies 1 inch apart.
- Bake for 10-12 minutes or until edges are just beginning to turn golden. Avoid over-baking to keep cookies tender.
- Cool cookies fully on wire racks before decorating.
- Prepare royal icing or buttercream and color as desired for piping. Use contrasting consistencies for outlining (thicker) and flooding (thinner).
- Pipe your designs as desired, allowing outlines to dry before flooding or layering icing. Embellish with edible decorations while icing is wet for best adhesion.
- Allow fully decorated cookies to dry at room temperature for at least 4 hours or overnight for perfect setting.
Tips for Success
- Keep dough cold: Proper chilling prevents spreading and helps maintain crisp edges.
- use gel food coloring: It won’t thin out your icing and maintains vibrant hues.
- Practice piping on parchment: Test pressure and flow before decorating your cookies.
- Store cookies: Once iced and dried, keep in an airtight container layered with parchment to preserve freshness for up to one week.
- Make ahead: Cookies freeze well pre-baked; thaw fully before decorating for smoother icing request.
Serving Suggestions
Arrange your decorated cookies on a tiered cake stand accented with fresh flowers or seasonal greenery for a stunning birthday display. Accompany with a jug of cold lemonade or your favorite tea to complement the buttery sweetness.For an extra festive touch,pair cookies with mini cupcakes featuring matching frosting colors or a simple fruit bouquet as a palate refresher between bites.
| Nutritional Info (per cookie) | Calories | Protein | Carbs | Fat |
|---|---|---|---|---|
| Decorated Sugar Cookie | 150 | 2g | 22g | 6g |
Discover More Sugar Cookie Decorating Tips
For advanced piping and decoration techniques, visit the Craftsy royal Icing Guide for expert tutorials and inspiration.

Q&A
Q&A: Sweet Celebrations – Decorating Sugar Cookies for Birthdays
Q1: What makes sugar cookies so perfect for birthday celebrations?
A1: Sugar cookies are a classic birthday treat as of their versatile flavor and smooth surface, which acts like a blank canvas for vibrant and creative decorations. Their lightly sweet taste complements a variety of icings and toppings, making them a crowd-pleaser for guests of all ages.
Q2: What are the best tools to gather before decorating sugar cookies?
A2: Essential tools include piping bags with assorted tips (round, star, and leaf tips), food-safe brushes, toothpicks or scribe tools for fine details, a rolling pin for smooth dough, and a variety of colorful food gels or powdered food colors. A clean, flat workspace also helps create precise designs.
Q3: How do I achieve that perfect royal icing consistency for decorating?
A3: Royal icing needs to be just the right consistency depending on the technique. For outlining, it shoudl be thick enough to hold its shape without running, like toothpaste. For flooding (filling in), it should be thinner, similar to honey, to spread smoothly. Adjust with small amounts of water or powdered sugar until you hit the ideal texture.
Q4: What creative ideas can make birthday sugar cookies stand out?
A4: Think beyond simple shapes-try cookie designs that reflect the birthday person’s hobbies or favorite things, like animals, balloons, or cupcakes. Use edible glitter, sprinkles, or metallic food paint to add sparkle. Layer different icing colors to create dimension, or try stenciling fun patterns for a professional touch.
Q5: How can beginners avoid common decorating mistakes?
A5: Start with simple shapes and basic designs to build confidence. Allow your cookie base to fully cool before decorating.Don’t rush the drying process between icing layers-patience prevents smudging. Practice steady piping on parchment paper before moving to cookies, and remember, imperfections add charm!
Q6: Can sugar cookies be prepared in advance for a birthday party?
A6: Absolutely! Sugar cookies can be baked and stored in an airtight container for up to a week. Decorated cookies, once fully dried, keep well and even improve in flavor after a day. For longer storage, freeze undecorated cookies and thaw before decorating closer to the celebration.
Q7: What tips can help decorate cookies with kids during a birthday party?
A7: Use thicker icing that’s easy to pipe and less likely to run. Provide fun decorations like colorful sprinkles, mini candies, and edible markers. Set up a decorating station with pre-filled piping bags and plenty of wipes.Emphasize creativity over perfection to keep the experience joyful and stress-free.
Q8: How can I incorporate themes into my sugar cookie decorations?
A8: Choose shapes and colors that match the birthday theme-like ocean blues and seashell shapes for a mermaid party or luminous rainbow hues for a unicorn celebration. Use fondant cutouts, edible prints, or hand-paint details to bring the theme to life. Personalized name or age details make them extra special.
Q9: What natural ingredients can add flavor without overpowering the classic sugar cookie taste?
A9: Vanilla extract is a timeless choice, but almond extract, lemon zest, or a hint of cinnamon offer subtle flavor boosts that complement the sugar cookie’s sweetness. Just a touch adds personality without overpowering your decorative artistry.
Q10: what’s the best way to present decorated sugar cookies at a birthday party?
A10: Display cookies on tiered trays or in colorful boxes with clear lids for gifting. Arrange them with themed props or fresh flowers to create a festive centerpiece. Wrapping individual cookies in clear bags tied with ribbon also makes for charming party favors that guests can take home.
Decorating sugar cookies for birthdays transforms a simple treat into a personalized work of edible art. With these tips and creative sparks, your sweet celebrations will be as memorable as the milestone itself!
The Conclusion
As the final sprinkle settles and the last swirl of icing takes its place, decorating sugar cookies for birthdays transforms from a simple craft into a heartfelt celebration of sweetness and creativity. Whether you’re a seasoned baker or a first-time decorator, each cookie becomes a tiny canvas, telling a story of joy, color, and personal touch. So next time a birthday comes around,remember: the magic isn’t just in the taste,but in the vibrant,edible art you create to make the day even more special.Happy decorating, and may your sweet celebrations be as bright and memorable as the smiles they inspire!