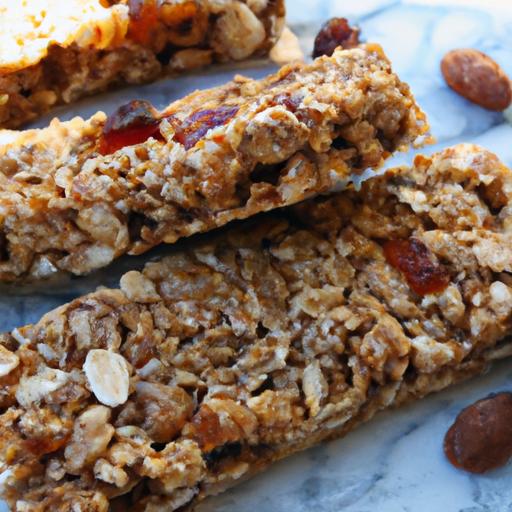
When hunger strikes between meals, reaching for a wholesome, satisfying snack can sometimes feel like a challenge. Enter the world of easy homemade granola bars-those delightful, crunchy bundles of energy that you can whip up in minutes right from your own kitchen. Packed with nutritious ingredients like oats, nuts, and natural sweeteners, these bars are not only a healthier option to store-bought options but also entirely customizable to suit your taste buds. Whether you need a quick breakfast on the go, a post-workout boost, or a treat for your kids’ lunchboxes, making granola bars at home is a simple, rewarding way to fuel your day with wholesome goodness. Let’s dive into how effortless it is to create these tasty snacks that blend convenience, nutrition, and flavor in every bite.
Easy Homemade Granola Bars offer a wholesome,chewy snack that perfectly balances nutrition and flavor while satisfying cravings on the go. These bars capture the essence of nourishing ingredients combined thoughtfully, making them an ideal choice for busy mornings, afternoon boosts, or post-workout nourishment.
Prep and Cook Time
- Preparation: 15 minutes
- baking Time: 20-25 minutes
- Cooling Time: 15 minutes
Yield
Makes 12 generously sized bars
Difficulty Level
Easy – perfect for beginner and experienced home bakers alike
Ingredients
- 2 cups old-fashioned rolled oats
- 1/2 cup natural almond butter (or any nut/seed butter)
- 1/3 cup honey (or pure maple syrup for vegan option)
- 1/4 cup brown sugar, packed
- 1/2 teaspoon vanilla extract
- 1/2 teaspoon ground cinnamon
- 1/4 teaspoon fine sea salt
- 1/2 cup chopped nuts (walnuts, almonds, or pecans)
- 1/2 cup dried fruit (cranberries, raisins, or chopped apricots)
- 1/4 cup unsweetened shredded coconut (optional, adds texture and flavor)
- 2 tablespoons chia seeds or flaxseeds for nutritional boost
Instructions
- Preheat the oven to 350°F (175°C). Line an 8×8-inch baking pan with parchment paper, letting excess hang over the sides for easy removal later.
- Mix the dry ingredients: In a large bowl, combine the rolled oats, chopped nuts, dried fruit, shredded coconut, chia seeds, cinnamon, and salt. Stir until evenly distributed.
- Warm the wet ingredients: In a small saucepan over low heat, gently warm the almond butter, honey, and brown sugar. Stir constantly until smooth, glossy, and completely combined, about 3-4 minutes. Remove from heat and stir in vanilla extract.
- Combine wet and dry: Pour the warm almond butter mixture over the oat mixture. Stir thoroughly with a spatula until every oat and nut is generously coated and sticky clumps form.
- Press firmly into the pan: Transfer the granola mixture into the parchment-lined pan. Using a second piece of parchment paper or the back of a spatula, press the mixture firmly and evenly to ensure compact bars that hold together.
- Bake: Place in the preheated oven and bake for 20-25 minutes until the edges turn a light golden brown.Avoid overbaking to keep the bars chewy rather than crisp.
- Cool completely: Remove the pan and let cool at room temperature for at least 15 minutes before lifting out the block using the parchment overhang.
- Cut into bars: Use a sharp knife to slice into 12 bars. For clean cuts, wipe the knife with a damp cloth between slices.
Chef’s Notes
- Customize your nut butter: Swap almond butter with peanut, cashew, or sunflower seed butter depending on your taste or allergies.
- Sweetener alternatives: Honey can be replaced with agave syrup or brown rice syrup for vegan-amiable bars.
- boost protein: Add a scoop of unflavored protein powder to the dry mix for an extra energizing snack.
- Prevent sticking: Pressing the mixture firmly before baking is the key to sturdy bars that don’t crumble.
- Make ahead & freeze: Store bars in an airtight container or freeze individually wrapped for up to 3 months.
Serving Suggestions
Serve your bars for a quick grab-and-go snack or slice smaller pieces to accompany a fresh fruit salad or greek yogurt. Garnish with a light drizzle of dark chocolate or a sprinkle of cinnamon for an elegant touch. For a crunchy contrast, pair with a handful of raw nuts or seeds on the side.

Choosing Nutritious Ingredients for Balanced Granola bars
Choosing nutritious, balanced ingredients is essential when crafting the perfect granola bars. Opt for high-quality rolled oats as your base – they’re rich in fiber and provide slow-burning energy. Natural nut butters contribute healthy fats and protein, while honey or maple syrup lend natural sweetness without refined sugars. Including dried fruits adds antioxidants and chewiness, and seeds like chia or flax introduce omega-3 fatty acids and fiber.Incorporating unsweetened shredded coconut or chopped nuts enhances texture while introducing essential micronutrients such as magnesium and iron. The blend of these components not only delivers flavor harmony but also sustains balanced nutrition to energize your day.
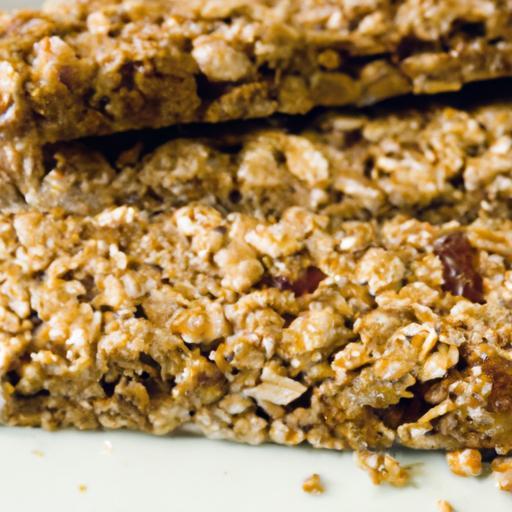
Step by Step Guide to Baking Perfectly Chewy Granola Bars
Achieving that perfect chewy texture is a balance between moisture and baking time. Pressing the mixture firmly into the pan locks ingredients tightly together, reducing crumbly results. Baking at a moderate temperature for around 20 minutes allows the edges to turn golden without drying out the interior. Removing your bars from the oven just before they look completely set ensures they stay soft as they cool. Resist the urge to slice bars too early; letting them rest helps solidify their chewy consistency. These subtle technique details transform simple ingredients into irresistibly soft yet structured granola bars.
Creative Additions to Boost Flavor and Nutritional Value
Explore adding a handful of dark chocolate chips or cacao nibs for a subtle bitterness that contrasts beautifully with the natural sweetness. Incorporate toasted pumpkin seeds or hemp seeds for extra crunch and a protein edge. For a tropical twist, add dried mango or pineapple pieces, keeping your bars vibrant and exotically flavored. Spice lovers can sprinkle a pinch of ground ginger or nutmeg to awaken warmth and depth. Each addition elevates not just flavor but ingredient diversity, enhancing the overall nutritional profile and indulgence-factor of your homemade bars.
Storage Tips to Keep Your Homemade Granola Bars Fresh Longer
Proper storage is key to maintaining that fresh-out-of-the-oven taste and chewy texture. Wrap individual bars in parchment paper before placing them in an airtight container-this prevents moisture buildup and clumping. Store at room temperature if consuming within one week. For longer preservation, transfer bars to a sealed container and refrigerate for up to two weeks or freeze them for up to three months. When thawing frozen bars, bring them to room temperature or gently warm for a few seconds in the microwave to regain softness. Avoid storing in plastic bags alone, which can cause condensation and sogginess.
| Nutrient | Per Bar (approx.) |
|---|---|
| Calories | 180 kcal |
| Protein | 5 g |
| Carbohydrates | 22 g |
| Fat | 8 g |
For more wholesome snack ideas, check out our Healthy Breakfast Ideas post. To learn about the science behind oat nutrition, visit Healthline’s detailed guide.
Q&A
Q&A: Easy Homemade Granola Bars – Healthy Snacks in Minutes
Q1: Why should I make homemade granola bars rather of buying them?
A1: Homemade granola bars put you in full control of the ingredients,allowing you to skip added sugars,preservatives,and artificial flavors commonly found in store-bought bars. Plus, making them at home means you get fresh, wholesome snacks tailored exactly to your taste-and you’ll save money too!
Q2: What are the basic ingredients needed for easy homemade granola bars?
A2: At their simplest, granola bars require a sturdy base like rolled oats, a natural binder such as honey or maple syrup, nut butter to add moisture and richness, and mix-ins like nuts, seeds, and dried fruits.From there, the flavor possibilities are endless!
Q3: How can I make granola bars without baking?
A3: No oven? No problem! Many granola bars can be prepared by simply mixing all the ingredients, pressing the mixture firmly into a lined pan, and chilling it in the fridge until set. This quick method is perfect for busy days and keeps the bars chewy and fresh.
Q4: Can homemade granola bars be customized for different diets?
A4: Absolutely! Whether you’re vegan, gluten-free, or following a low-sugar lifestyle, homemade bars can be easily adapted. Swap honey for agave or date syrup, use gluten-free oats, and add ingredients like chia seeds or coconut flakes for extra nutrition without compromising flavor.
Q5: How long do homemade granola bars last?
A5: When stored in an airtight container, homemade granola bars generally stay fresh for about a week at room temperature. For longer storage, keep them in the fridge where they can last up to two weeks, or freeze them for up to three months-perfect for prepping snacks in advance.
Q6: What are some creative add-ins to make granola bars more exciting?
A6: Think beyond the usual! Try adding dark chocolate chips, shredded coconut, pumpkin seeds, cinnamon, or even a sprinkle of hemp seeds. These ingredients add delightful textures and flavors while boosting the nutritional power of your bars.Q7: Is it possible to make granola bars kid-friendly?
A7: Definitely! Use kid-approved ingredients like a handful of mini chocolate chips, dried strawberries, or crushed cereal for extra crunch. Keep the sweetness moderate and involve kids in making the bars-it’s a fun way to encourage healthy snacking habits!
Q8: What’s a simple tip to ensure my bars hold together well?
A8: Press the mixture firmly into the pan using the back of a spoon or your hands lined with parchment paper. Compacting the bars tightly before chilling ensures they don’t crumble when cut and handled.
Q9: How can I boost the protein content in homemade granola bars?
A9: Incorporate ingredients like nut butters (almond, peanut, or cashew), roasted chickpeas, pumpkin seeds, or a scoop of your favorite plant-based protein powder.These additions help keep you full and energized longer.
Q10: Can I make granola bars in advance for busy mornings?
A10: Yes! Homemade granola bars are excellent make-ahead snacks. Prepare a batch during your weekend routine, store them properly, and grab one on your way out for a nutritious boost that’s ready when you are.
With these questions and answers, you’re all set to create delicious, healthy homemade granola bars in minutes-snacking never tasted so good or felt so good!
The Way Forward
Whipping up your own granola bars at home isn’t just a fun kitchen project-it’s a simple step toward healthier snacking that fits perfectly into your busy life. With a handful of wholesome ingredients and just a few minutes, you can craft delicious, customizable bars that fuel your day without the added sugars and preservatives found in store-bought options. So next time hunger strikes,skip the packaged snacks and reach for your homemade granola bars-a tasty,nutritious bite made with care and creativity. here’s to snacking smarter, one bar at a time!