There’s something utterly enchanting about watching a simple cup of hot chocolate transform into a swirling, creamy delight-especially when the magic starts with a dazzling chocolate sphere. Welcome to the world of hot chocolate bombs, where confectionery artistry meets cozy indulgence. In this step-by-step tutorial, we’ll unravel the secrets behind crafting these melt-in-your-mouth marvels, guiding you from glossy chocolate shells to the moment they burst open, releasing a cascade of cocoa and marshmallows. Whether you’re a seasoned chocolatier or a curious beginner, prepare to melt your worries away and create your very own edible winter wonderland. Let’s dive into the melt magic!
Choosing the Perfect Chocolate for Irresistible Hot Cocoa Delights
Melt Magic begins with selecting the ideal chocolate to create truly irresistible hot chocolate bombs. The type and quality of chocolate you choose set the foundation for flavor and texture, making this step crucial for crafting decadent, melt-in-your-mouth delights. Whether you prefer the velvety smoothness of high-quality dark chocolate,the creamy sweetness of milk chocolate,or the delicate richness of white chocolate,each brings its own signature charm to your cocoa experience. For the best results, opt for couverture chocolate or chocolate with at least 35-40% cocoa butter content, as these melt beautifully and yield a glossy finish that’s both elegant and professional.
Additionally, consider the cocoa percentage carefully; a 60-70% dark chocolate strikes a perfect balance of bitter richness and sweetness that complements the foamy milk or plant-based milk you pair with it. if you love a sweeter cup, milk chocolate with around 40-50% cocoa is the way to go. When melting chocolate for your bombs, smaller, uniform pieces melt evenly, preventing scorching and ensuring a silky texture.
Prep and Cook Time
- Planning: 25 minutes
- Setting/Freezing: 30 minutes
- Total Time: 55 minutes
Yield
4 large hot chocolate bombs (serves 4 cups)
Difficulty Level
Medium – Requires a steady hand and patience for perfectly shaped spheres
Mastering the Art of Mold Filling and Sealing for Flawless Bombs
One of the most rewarding steps in Melt Magic is filling and sealing your chocolate molds with precision. The key is to create even, thin walls of chocolate that hold together firmly but melt effortlessly in your mug.Begin by carefully tempering your chocolate,which stabilizes the cocoa butter crystals,yielding a firm,shiny shell that snaps when broken.
Using a silicone half-sphere mold, spoon the tempered chocolate into each cavity, then gently rotate and tap the mold to coat all surfaces evenly-thin yet opaque walls are essential. Scrape off excess chocolate with a palette knife to clean the edges. Refrigerate the mold briefly to set the shells sturdy enough to unmold.
For the filling, load one half with your chosen hot cocoa mix and creative add-ins. To seal, gently warm a plate or flat pan, then press each filled half gently onto the warm surface to slightly melt the edges. Quickly press the two halves together to form a sealed sphere. A toothpick can smooth any seams for a seamless finish. Freeze the bomb for at least 20 minutes-the result: flawless, glossy spheres ready to enchant your guests.
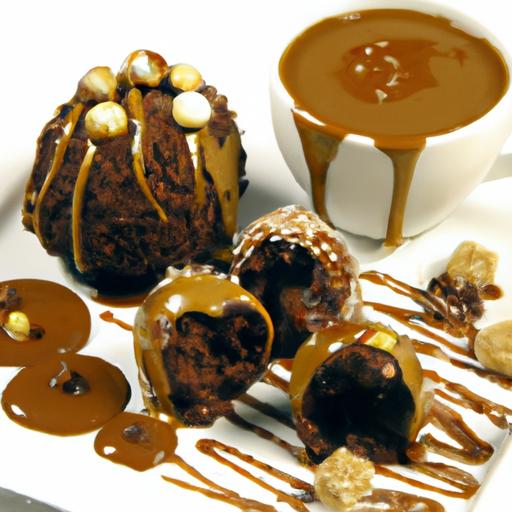
Innovative Filling Ideas to Elevate Your Hot Chocolate Experience
Elevate your Melt Magic by experimenting with inventive fillings that surprise and delight with every sip. Beyond the customary cocoa powder and mini marshmallows, try incorporating flavors and textures that tantalize the palate:
- Spiced cocoa blends infused with cinnamon, nutmeg, or cardamom give a subtle warmth and complexity.
- Crunchy surprises like crushed peppermint candy,toffee bits,or sea salt caramel nuggets.
- Decadent additions such as freeze-dried raspberries or a sprinkle of chili powder for a bold kick.
- vegan-kind options like coconut sugar or coconut marshmallows enhance sweetness with a tropical twist.
- Nut butter dollops (almond, hazelnut) hidden inside melt into a luscious swirl when hot milk is added.
These fillings burst forth in your cup, creating an immersive sensory experience that makes every chocolate bomb unforgettable.
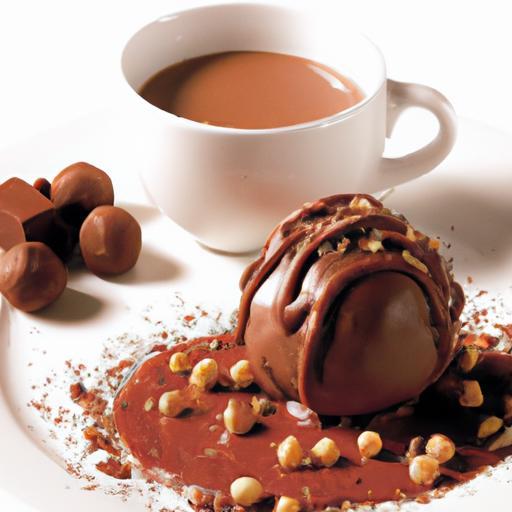
Expert Tips for Melting and Serving Your Magical Hot Chocolate Bombs
Precision is everything when melting and serving your hot chocolate bombs to deliver that perfect cup of warmth and indulgence. Use gently heated milk-whole, almond, oat, or cashew milk work beautifully-to coax your chocolate shell into a swirling cascade of richness.
When pouring the warm milk over your Melt Magic bomb in a mug, watch as the shell spectacularly melts, releasing the hidden treasures and letting you stir a creamy symphony of flavors. To avoid scorching, melt chocolate slowly over a double boiler or in short bursts in the microwave, stirring frequently for silkiness.
Serve your hot chocolate with a festive touch: whipped cream crowned with grated chocolate or a cinnamon stick stirrer. For a dramatic reveal, utilize clear mugs so guests experience the captivating melt first-hand. Store your bombs in an airtight container and freeze to maintain their crispness until ready to impress.
Ingredients
- 8 oz couverture chocolate (dark, milk, or white), chopped finely
- 1/2 cup premium hot cocoa powder
- 1/4 cup mini marshmallows (vegan marshmallows optional)
- 1 tsp ground cinnamon (optional, for spice)
- 2 tbsp crushed peppermint candies (optional)
- 1 tbsp freeze-dried raspberry pieces (optional)
- Warm milk or plant milk for serving (about 1 cup per bomb)
Instructions
- Temper the chocolate: Melt 2/3 of chocolate over a double boiler, stirring gently until melted.
- Cool it down: Remove from heat and add remaining chocolate pieces, stirring until smooth and lukewarm.
- Fill molds: Spoon chocolate into silicone half-sphere molds, tilt and turn to coat evenly. Chill 10 minutes.
- Add fillings: Once set, fill each half-sphere with cocoa mix, marshmallows, and chosen add-ins.
- Seal the bombs: Warm a flat pan and gently press the edges of each half on the warm surface, then join two halves. Smooth seams with a toothpick.
- Freeze: Place completed bombs in freezer for 20-30 minutes to fully set.
- serve: Place a bomb in your favorite mug, pour 1 cup warm milk over it, watch the magic melt, and stir thoroughly.
Tips for Success
- Use only dry cocoa powder to prevent clumping inside your bomb.
- Warm your sealing surface just right-too hot melts the bomb, too cool won’t seal.
- Store bombs in airtight containers in the freezer to keep shells crisp.
- Experiment with infused chocolates by adding a pinch of sea salt for contrast.
- For shiny, crack-resistant shells, practice tempering or use high-quality couverture.
Serving Suggestions
Bring out the full spectacle of Melt Magic by serving bombs in clear mugs or heat-resistant glass cups. Garnish with a dollop of whipped coconut cream or a sprinkle of cocoa powder and crushed candy canes.Add a cinnamon stick or flavored stir spoon for aroma and elegance. This makes a beautiful wintertime gift or centerpiece for cozy gatherings.
| nutritional Info (per bomb) | Calories | Protein | Carbs | Fat |
|---|---|---|---|---|
| Dark Chocolate Bomb | 280 kcal | 4 g | 24 g | 19 g |
| Milk Chocolate Bomb | 320 kcal | 5 g | 30 g | 21 g |
| White Chocolate Bomb | 350 kcal | 3 g | 32 g | 24 g |
Explore more about cocoa varieties and hot chocolate pairings or deepen your chocolate knowledge with insights from The National Confectioners Association.

Q&A
Q&A: melt Magic – Your Ultimate Hot Chocolate Bomb Tutorial
Q1: What exactly is a hot chocolate bomb?
A hot chocolate bomb is a hollow chocolate sphere filled with cocoa powder, marshmallows, and other delicious surprises. When placed in a cup and doused with hot milk, it magically melts, unleashing a rich, creamy hot chocolate experience right before your eyes.
Q2: What ingredients do I need to make hot chocolate bombs at home?
You’ll need good quality melting chocolate (dark, milk, or white), cocoa powder, mini marshmallows, powdered sugar, and any add-ins you love-think crushed peppermint, cinnamon, or even tiny chocolate chips for a twist. Silicone molds designed for spherical chocolates are also a must-have.
Q3: How do I ensure my chocolate shells turn out perfectly smooth and glossy?
Tempering your chocolate is the secret! this means gently melting and cooling the chocolate to stabilize its crystals, giving the shells a shiny finish and satisfying snap. You can temper by hand with a double boiler or use the seeding method with chopped chocolate.
Q4: Can I customize my hot chocolate bombs?
Absolutely! Besides the classic marshmallows and cocoa, feel free to add dried fruits, crushed nuts, instant coffee granules, or flavored sprinkles. You can even mix different types of chocolate shells like a half-white, half-dark bomb for a striking look.
Q5: What’s the best way to seal the two chocolate halves?
Lightly warm a flat surface (a plate or countertop works) and gently press the edge of one half onto it to melt it slightly, creating a glossy tacky rim. Then quickly press the other half on top to seal.Hold gently to let them bond, and voilà-a perfect chocolate sphere!
Q6: How should I store the finished hot chocolate bombs?
Keep them in a cool, dry place away from direct sunlight. A sealed container or an airtight bag works great to prevent moisture from dulling that shiny chocolate surface. They should stay delightful for up to two weeks-if they last that long!
Q7: What’s the best method to “unleash” the hot chocolate bomb magic?
Place your bomb in a mug and pour steaming hot milk over it (not boiling, to avoid cracking). Watch as the shell melts away, marshmallows float up, and rich cocoa mixes perfectly. Stir gently after the show to bring all the flavors together.
Q8: Can kids get involved in making hot chocolate bombs?
Definitely! Kids love filling the molds and decorating the finished bombs with drizzles or sprinkles. Just be sure an adult handles the chocolate melting and tempering steps for safety and best results.
Q9: how long does it take to make hot chocolate bombs from start to finish?
From melting the chocolate to sealing the shells and filling? Plan for about 1-1.5 hours, including cooling times. It’s a fun,hands-on process that’s well worth the delicious,cozy payoff.
Q10: Any troubleshooting tips if my chocolate bombs don’t seal properly?
If they won’t stick together, check that your chocolate edges aren’t too thick or cold. Slightly reheating those edges helps. Also, avoid overfilling with marshmallows and cocoa-too much filling can prevent a snug seal.
Ready to bring a little melt magic to your kitchen? With this step-by-step guide, warm, whimsical hot chocolate bombs await your creativity!
Final Thoughts
as the final cocoa sphere melts away, unveiling a swirling cascade of rich chocolate and velvety marshmallows, you’ve not only crafted a delightful treat-you’ve unlocked a little bit of winter wonder. with each step in this Hot Chocolate Bomb tutorial, you’ve transformed simple ingredients into a magical moment, perfect for warming hearts and sparking smiles. So next time the chill sets in, remember: a melting chocolate bomb isn’t just a drink-it’s an experience waiting to unfold. Happy sipping, and may your hot chocolate adventures always be a little bit magical!